TICKER
AMOON
Before you can delegate, you will need to have your coins in a wallet, rather than in an exchange service like Kraken, Coinbase, Binance, etc. This is a good step to take whether you are delegating or not, to secure your ADA and keep it in your control.
There are two official wallets, Yoroi or Daedalus. Daedalus is a "full-node" wallet, which means that you will need to store the entire blockchain on your computer, which will keep syncing. We recommend and will provide instructions for the Yoroi wallet, which is a "lightweight" wallet running in a browser extension or mobile app, and is more convenient to use (this is what our team uses also!)
Click Download. From the dropdown menu, select the platform or browser you are trying to install for.

Follow the instructions in your browser or app store to download the extension, and open it up.
Once you open the Yoroi app, it will ask you to select your language. Do so and click "continue".

You will be presented with a Terms of Service to accept. Do so, and click continue. The next page will ask you whether you want to enable Cardano payment URLs. This is an optional step.
On the home screen, if you have a hardware wallet device, select that option and follow the pairing instructions. Otherwise, by default, you can select "Create wallet".

The Yoroi wallet supports storage for both the Ergo and Cardano cryptocurrencies, and will thus ask you which currency you would like to create a wallet for. Select Cardano to continue.

The next option asks whether you would like to create a normal wallet or paper wallet. A paper wallet is well suited for devices not connected to the internet as an extra measure of security, but is not necessary (to properly take advantage of it, steps should be taken to disconnect internet while generating keys also, etc.). You can select "Create wallet" to continue.

In the next step, you can can set the name and spending password for your wallet. Enter these, and select "Create Personal Wallet".

The next section is the most important part for your wallet security. You will be asked to write down a "recovery phrase" of 15 random words for your wallet. These should be written down on paper, and stored safely. If this is lost, you may not recreate your wallet on any other device. Similarly, if it falls into the wrong hands, someone else will be able to recreate your wallet on their device and control it. In our recommendation, store multiple copies of this phrase, or ideally with someone you absolutely trust.


After confirming that you have written down the phrase, you will be asked to recreate your recovery phrase from the individual words, by dragging and dropping.

Your wallet has now been created! This will be the home screen when you open Yoroi now!

The next step you will want to do is actually transfer funds to your wallet. You can do this by first going to the "Receive" tab in Yoroi.

Here you can find the wallet address that you will need to provide your exchange service in order to send your money to your wallet. You will need to follow the instructions for your exchange to do this.
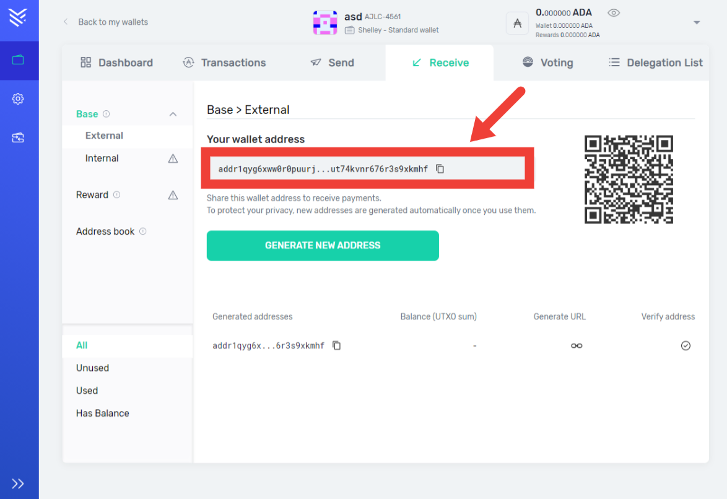
Login to you binance account (or other exchange, the process will be similar) and go to withdraw tab, select ADA from the dropdown and copy the receive address from YOROI wallet and enter into the recipient address, choose the number of coins you’d like to transfer and hit submit.

*If this is the first time you are setting up a brand-new wallet, Do not send all your coins at once. Send a minimal number of coins like 10 or 20 before you make a large transaction to make sure your funds arrive safely.
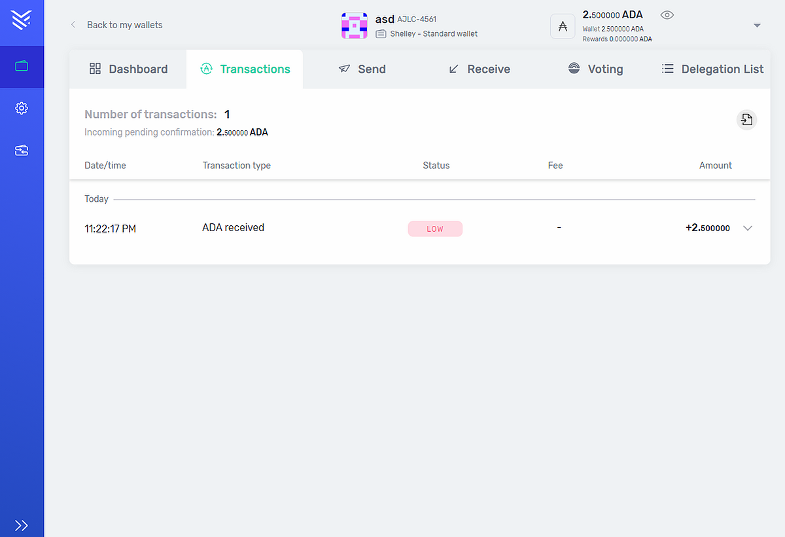
You should see a transaction ID (TxID) generated within a couple minutes which when clicked will take you to cardanoscan to verify your transaction. When TxID generated it means your coins had left the exchange.

After a few minutes your transaction should show up in the "Transactions" tab. It takes 10 confirmations for status to go from Low to High (Green)
Finally, we can delegate! To do so, go to the "Delegation List" tab in Yoroi.

In the "Search By Id or Name" field, type in "AMOON" and hit search. We should be the first result :)
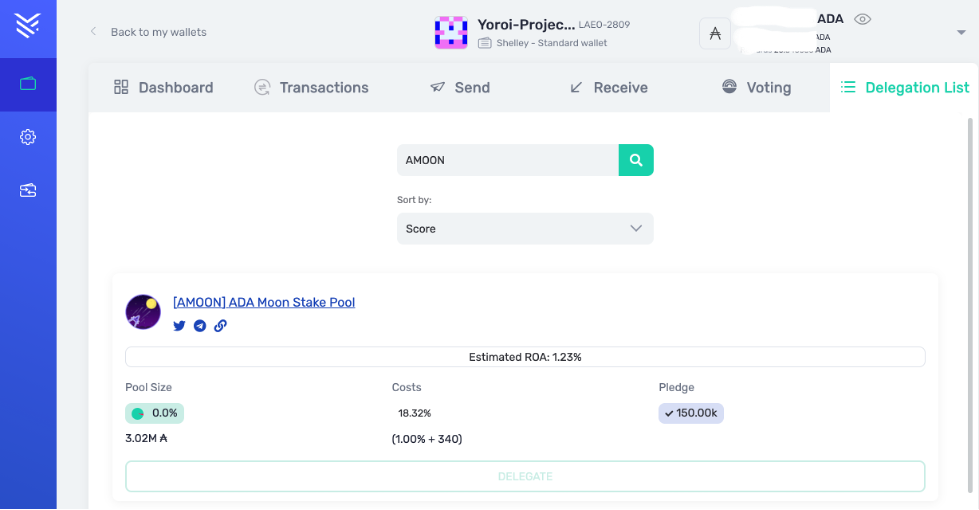
Click the green "Delegate" button, The first time you delegate, you will need to submit a deposit of around ~2.17 ADA. While frustrating, this is a measure to prevent attacks on the network and for generating a stakekey for you. 2 ADA deposit will be returned when you stop staking altogether and ~0.17 is the transaction fee. You will not pay the 2 ADA again if you choose to delegate to another pool in the future.
To continue, enter your spending password that you selected when creating your wallet.

A popup should appear indicating that you have successfully delegated and take you to the Dashboard page. Scrolling down in your dashboard, you should see that you are officially delegated to AMOON pool! Please note that from when you delegate, it will be 4 "epochs" (each epoch is 5 days, so 20 days total) before you see your first rewards.
This is because it will take 2-3 epochs for your delegation to become "active", and then after the epoch in which your stake is active, one more epoch is required to calculate rewards before distribution.And that's all there is to it! We are excited to have you along for the journey; we are stronger together, ADA TO THE MOON! :)

Follow us on twitter or join our Telegram!
High Performance, Secure and Cloud hosted pool. Let's together send, ADA TO THE MOON!